
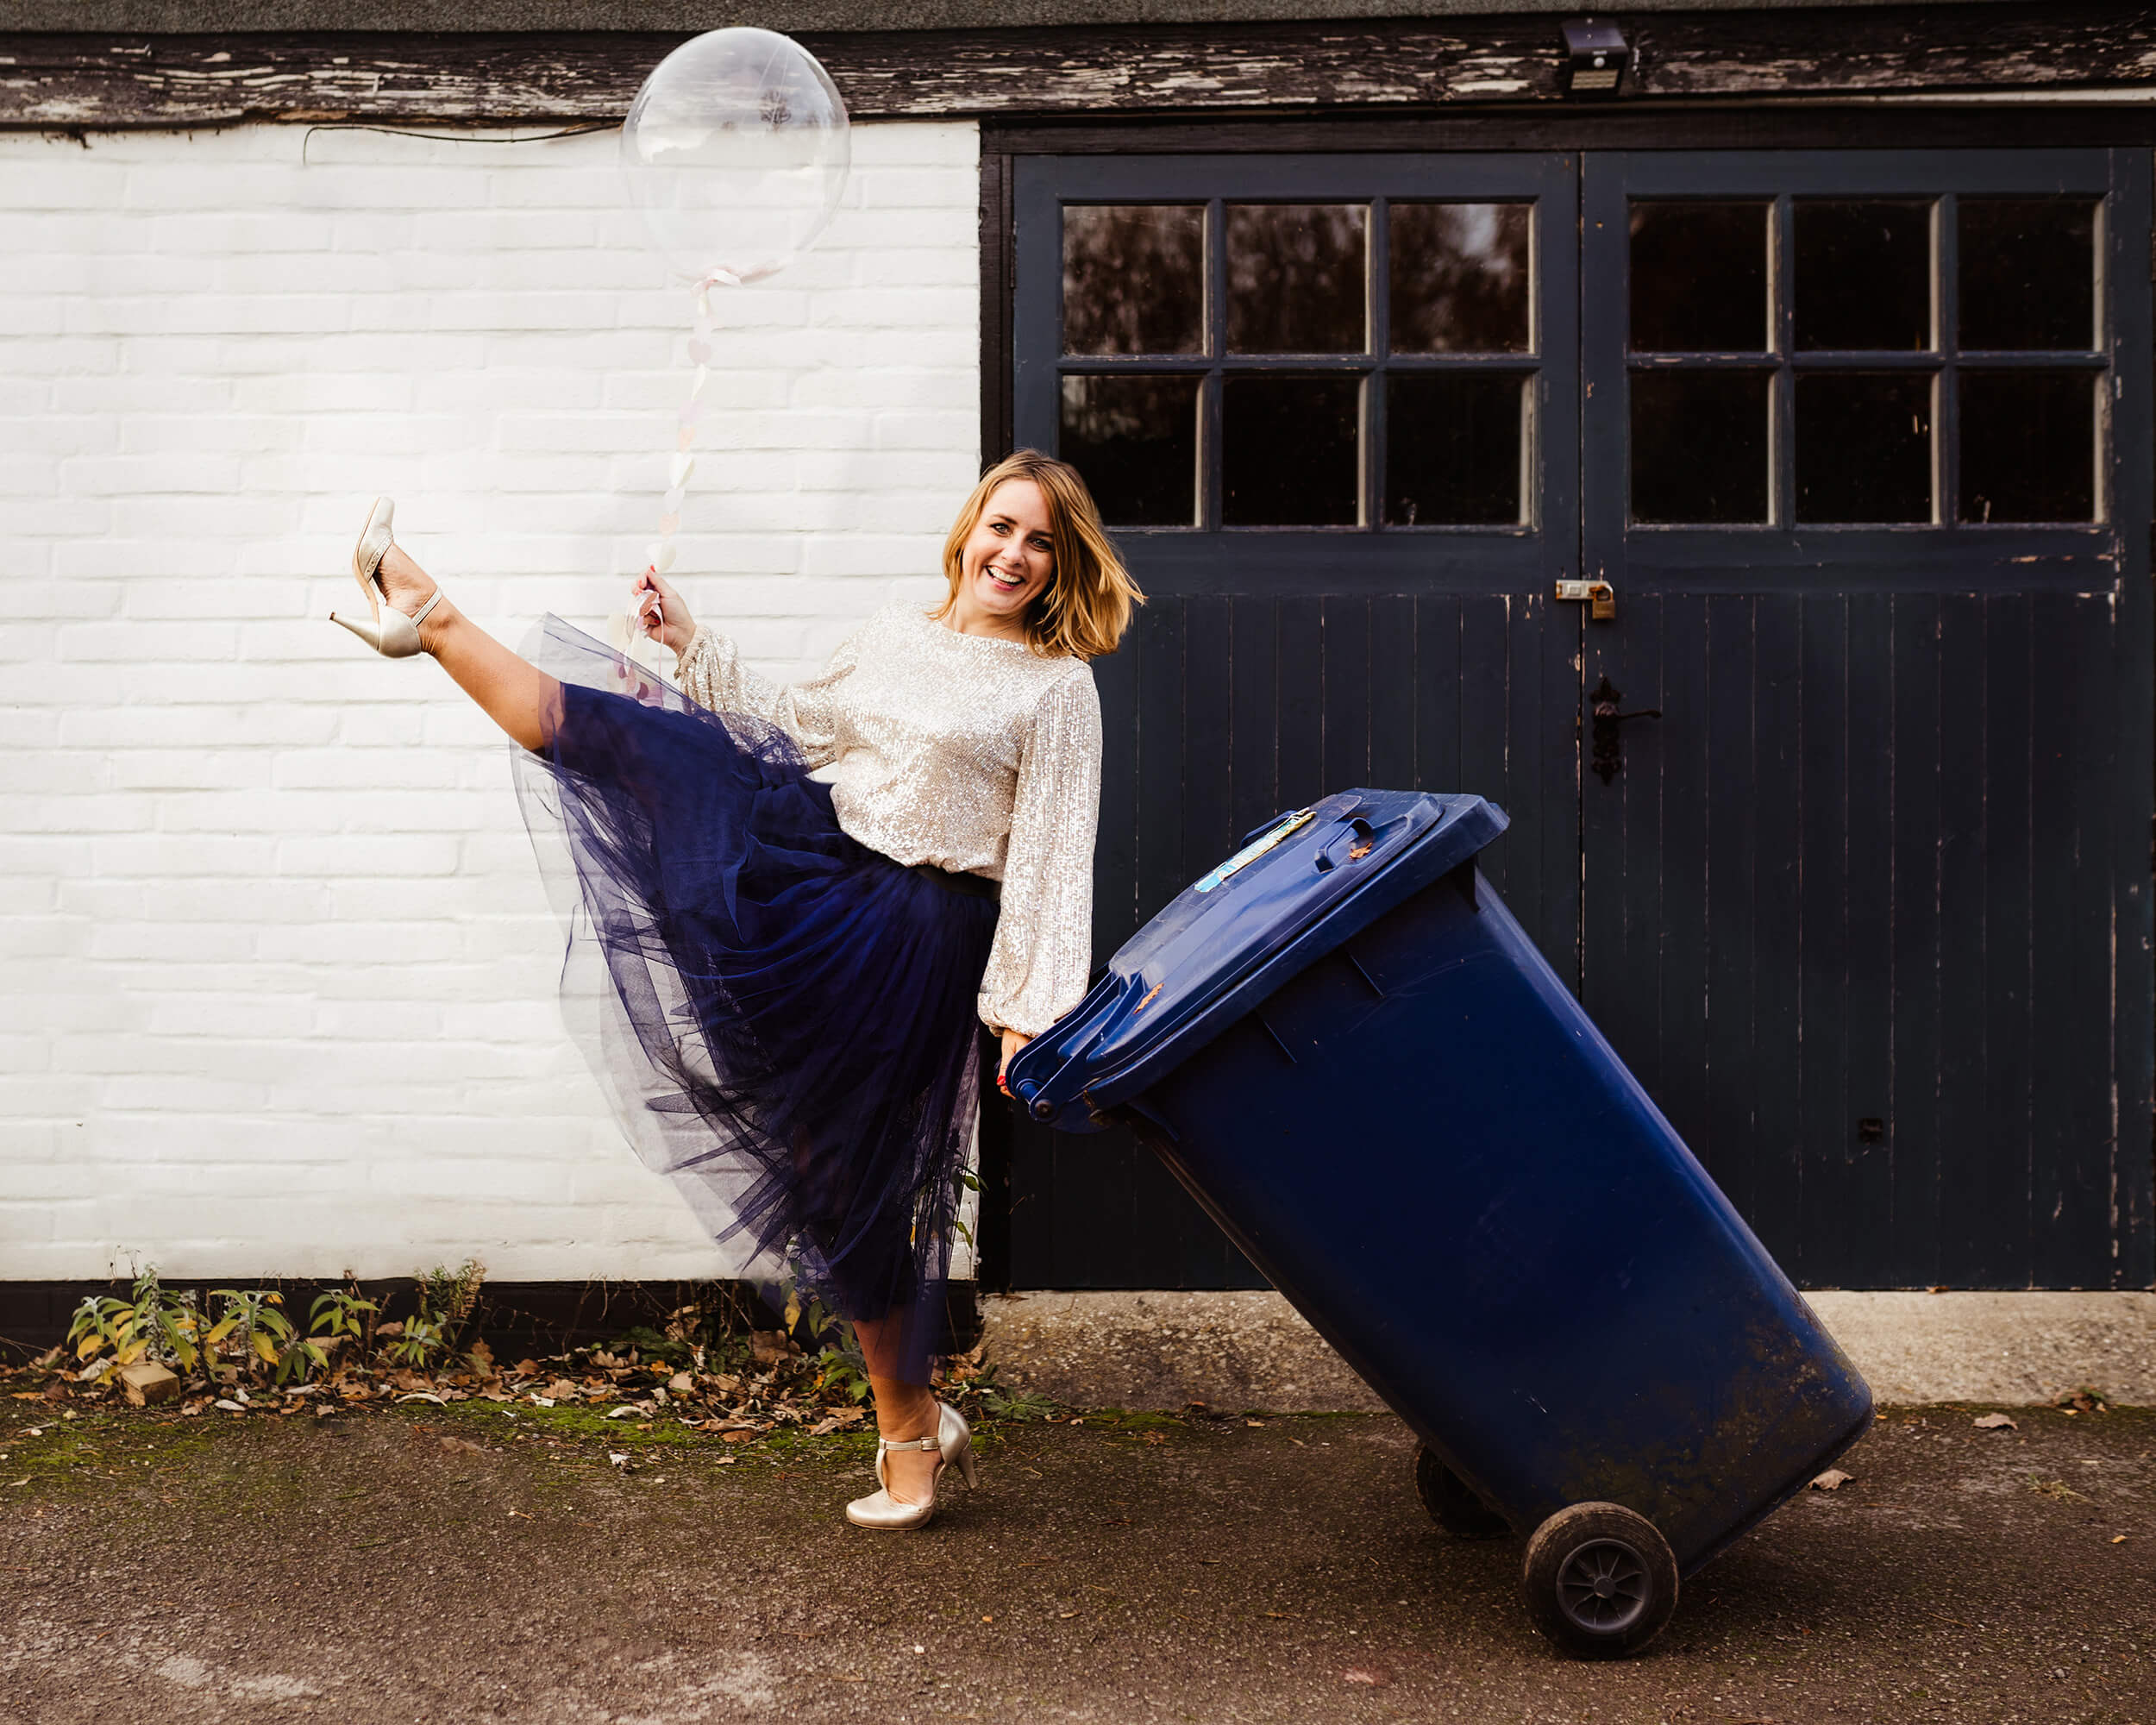


Hello! I thought I’d share a post about photo taking and editing for Instagram.
I am not a photographer but I love photography and have managed to create an online community and business by taking photos so I thought I’d share a few tips.
I do have a ‘proper camera’ but rarely remember to take it with me, and if I do then the battery is probably flat. HOWEVER I do use it for some interior shots if I am doing a shoot for a brand as it copes better in certain lights.
Generally speaking for instagram, a phone and a steady hand is fine!
You might use Instagram for many different reasons. You might love the escapism and enjoy a pleasant scroll. You might run a business and want to grow that business using IG. You might be wanting to improve your photos for fun, or you might be wanting to grow your following and know that good pics can really help, actually I’d say good pics are vital.
If you are here, reading this, I will presume that you would like to improve your Instagram photography, and maybe grow your following too. So let’s go back to basics and ask you to look at your grid – are you proud of your photos? Are they pleasing to the eye? Is the light good, have you edited them so they look their absolute best?
Are they in focus?!!!
It’s your shop window after all. When someone lands on your page, they will make a decision about whether to follow you, in just a few seconds, usually based on your grid. So no matter how many killer captions you have written, how funny or knowledgeable you are, how amazing you are as a person and whatever you have to offer, if the images aren’t up to scratch, it’s highly likely they’ll move on without following. It’s a tough audience!
Of course there are always exceptions to a rule and occasionally I will lazily follow a person just because loads of others do too, there’s that herd mentality haha! Quite often, I’ll unfollow after a while because their media just isn’t relative to me, or I just don’t find myself engaging with the caption. It’s ok to unfollow! OR if that makes you feel bad – just MUTE them. That way, you are still following them, but you won’t see their media. You can choose to mute grid posts and or stories. To mute, click the white box that says ‘following’ and you will get a drop down option, to unfollow, restrict or mute, they won’t know so don’t worry! You need to look after your own mental health too – so mute or unfollow any one who makes you feel less than good about yourself.
Sometimes I will follow because that person has left comments on mine or others’ grid posts that make me laugh! So it is worth engaging and commenting on other people’s posts, you never know what connections it could lead to – don’t do it with that intention though – I am a firm believer that Instagram shouldn’t be fake or forced – you’ll get far more out of it if you give more than you take. Be generous, scatter likes like confetti – if you like a photo, double tap it! Leave a comment- reply to comments left on your posts – again – if someone has spent the time to comment – REPLY! It forms connections and friendships! If you chase the likes and follows -they won’t come. Spend time engaging with no motive.
Be inspired, find lovely images and save them. You don’t have to screen shot everything you like – you probably know – but if not, it’s time to discover the SAVE button, SAVE allows you to create your own private, mini Pinterest within Instagram. You can even organise them in to boards – say, ‘Recipes’ ‘Wall Colours’ ‘Clothes’ ‘Stuff that Makes Me Laugh’ ‘Ideas’
Here’s how –

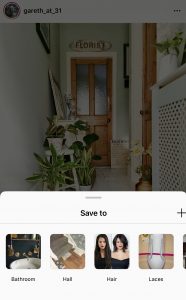
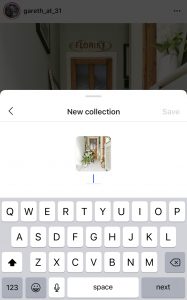
The little flag is your save button – when it turns black you’ve saved the image, click ‘save to collection’ when it pops up and create a new board or save to an existing one. To find all of your saved images go to your own account and press the three lines at the top by your name. A drop down box will appear – you’ll see the little flag and the word ‘Saved’ – there you go! No more screen shots and losing things.
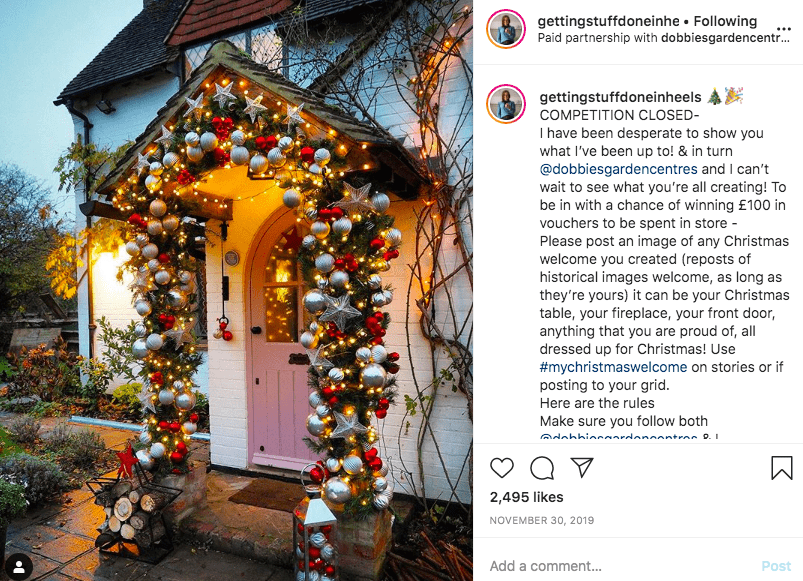
(Incidentally Gareth @Gareth_at_31 is a brill account to follow Gareth cracks me up and he’s got a fab house)
Back To The Photos
So let’s dive in! I am not telling you what to do – just sharing what I do. There’s more than one way to skin a cat after all! (That poor cat)
We all know how to take a photo but when creating one for the grid, it can sometimes feel overwhelming when you are seeing so many beautiful images from others, every day. ‘Insta worthy’ photos can be taken by anyone! It takes a bit of thought, planning and time. Oh and practise!
I have heard of the ‘rule of thirds’ and you can investigate it more HERE, but I have to be honest and say I don’t think about that when I take a photo – I know what I like and hope the photos I take, work. A professional would probably disagree and tell you that you must consider the Rule Of Thirds – I suppose it depends on what sort of person you are, and how you like to work – it’s your grid and they are your photos!
Here are my key points – (most of my shots are interiors but the occasional human or animal makes an appearance.)
For Instagram, always shoot in portrait rather than landscape. IG doesn’t like images taken in landscape and they aren’t optimised to fit the grid, leaving blank spaces above and below the shot. You don’t have to shoot in square mode any more, you can pinch the portrait photos to fit.
I always take the photo in camera mode on my phone, rather than within Instagram.
Clean your phone camera lens! It may sound obvious, but if you are shooting with a smear on the lens, the image is ruined before you’ve even started. Just a quick wipe with a corner of your top – nothing fancy
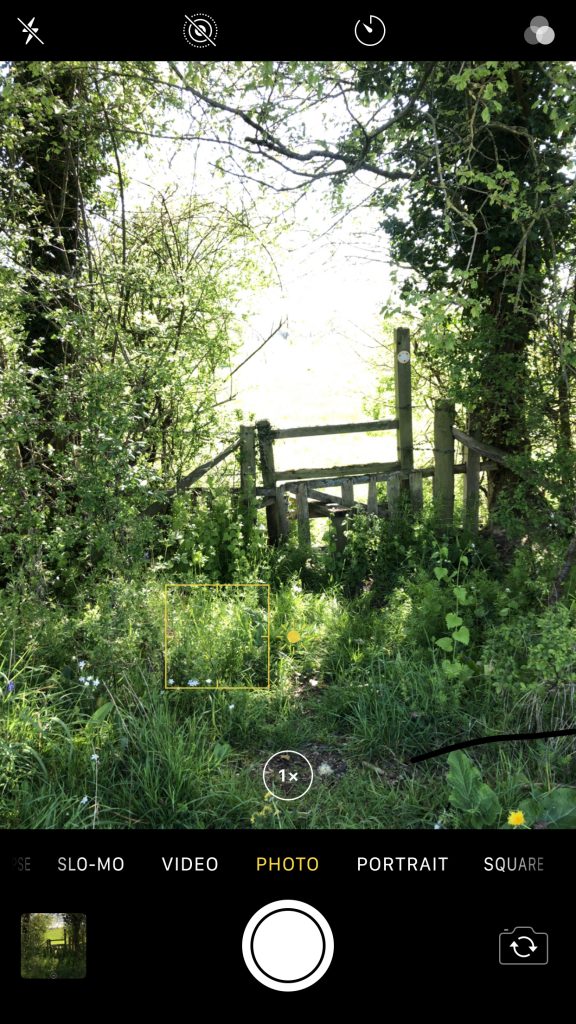
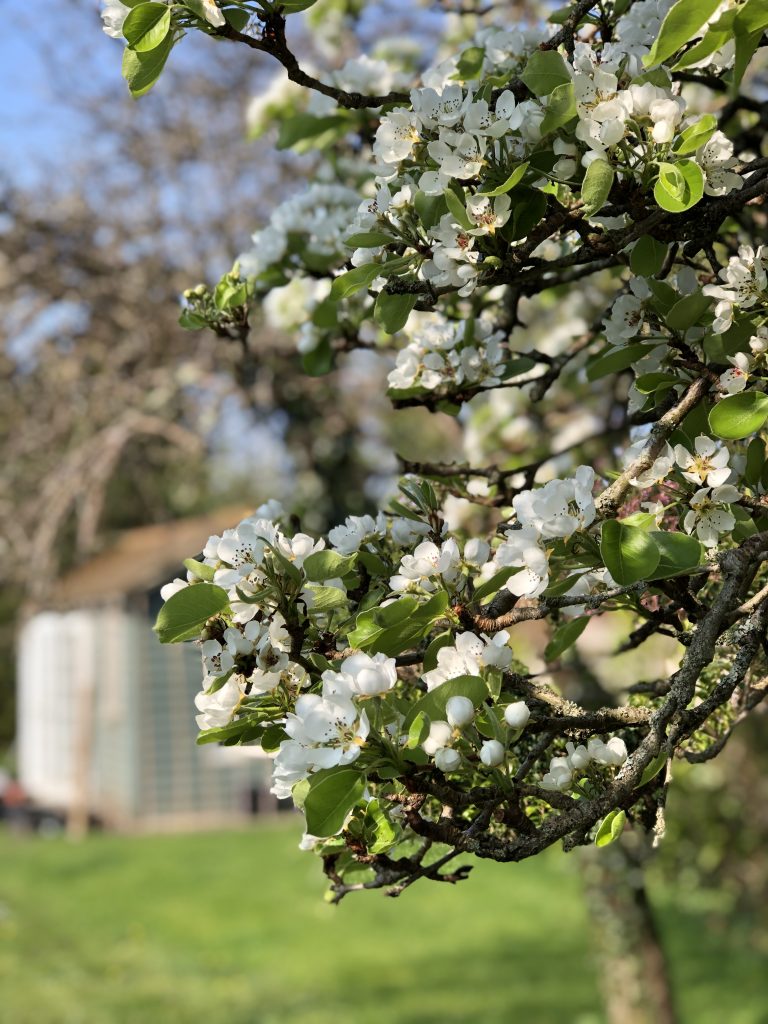
Tap the screen in different places to find the best light and to focus on your subject. If you want to be able to see what’s outside a window, taking the photo from inside the room – tap the screen where the window is – it will send the interior part of the shot quite dark but clearly show outside. If you tap a different area on the screen, say of the chair by the window inside the room, it’ll blow out the view outside and lighten the area inside.
Here’s an example from my walk this morning to give you an idea of what I mean. The yellow square shows you where I tapped on the screen in each shot. Have a play with your phone or for more tips on what your phone can do – This Guy Is Really Good On Facebook (I just follow his posts – I haven’t signed up or anything)

If you are trying to capture a moment, such as someone leaping in the air – use burst mode and simply pick the best photo from there.
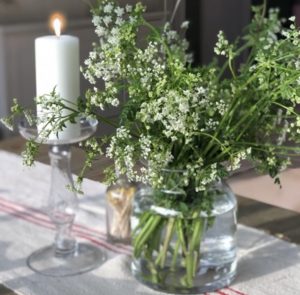
You need the best light possible. Electric light is an nightmare and gives a nasty tinge to the shot. It often gives ’spurs’ that appear off each light -using a proper camera can rectify the spur situation. I try to avoid taking photos with the main ceiling lights on though. (Side lights aren’t too bad & can give a cosy glow.)
Dull light is tricky too, and I NEVER use a flash.
Equally, bright sunlight is a challenge it blows out the detail.
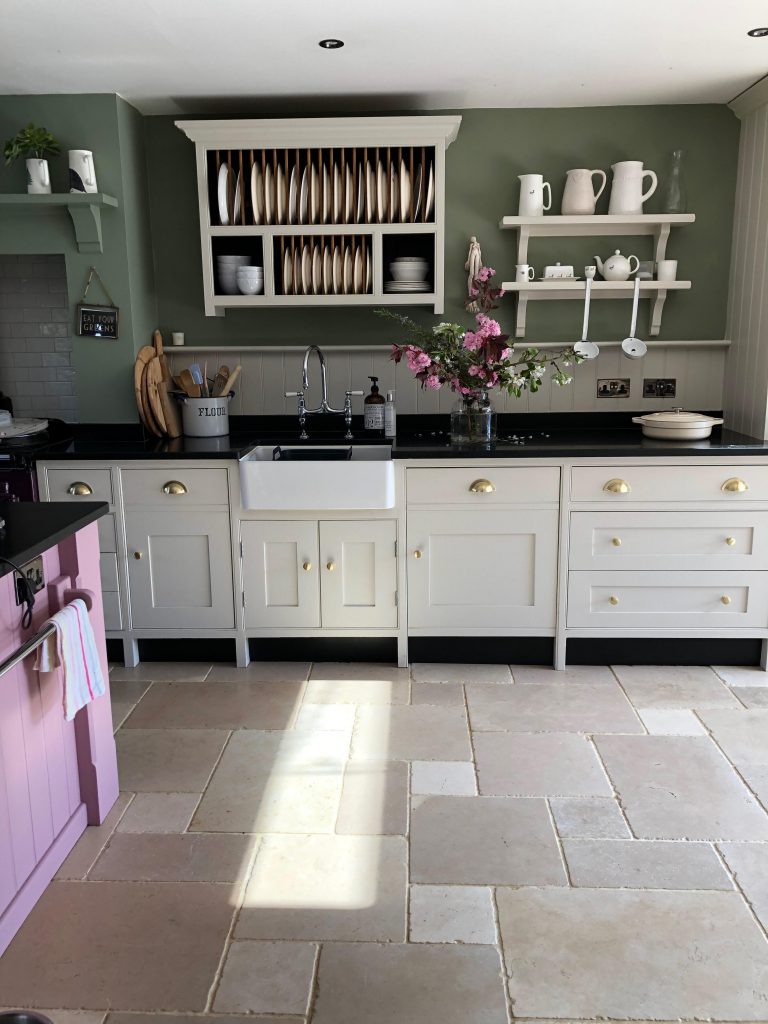
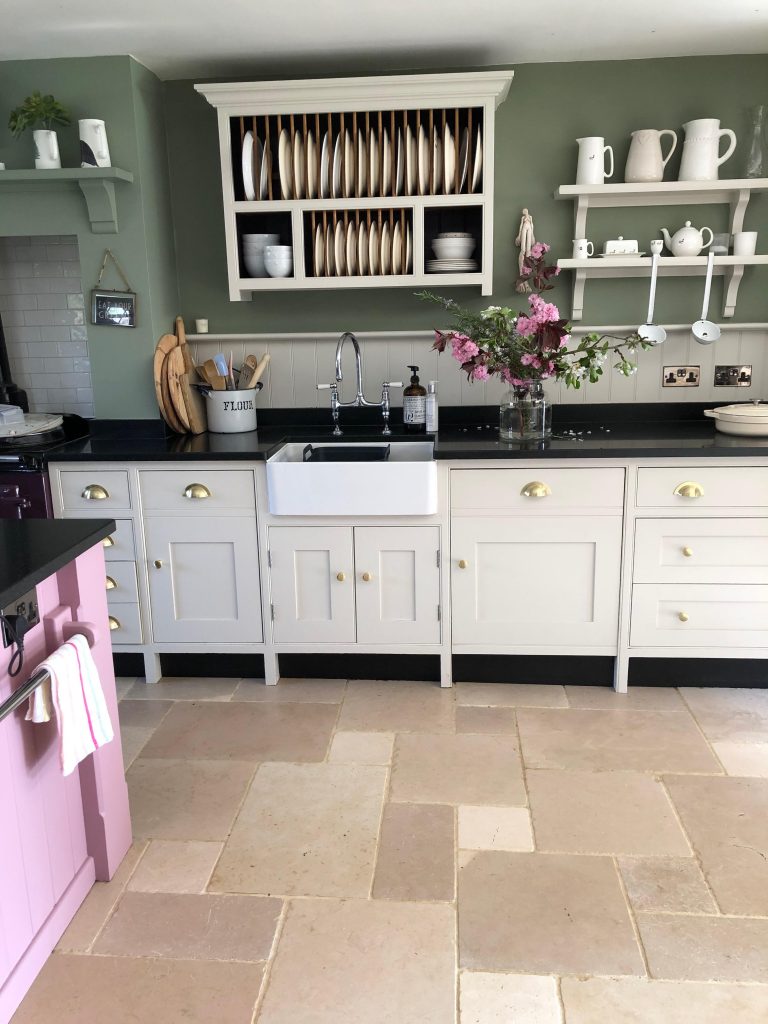
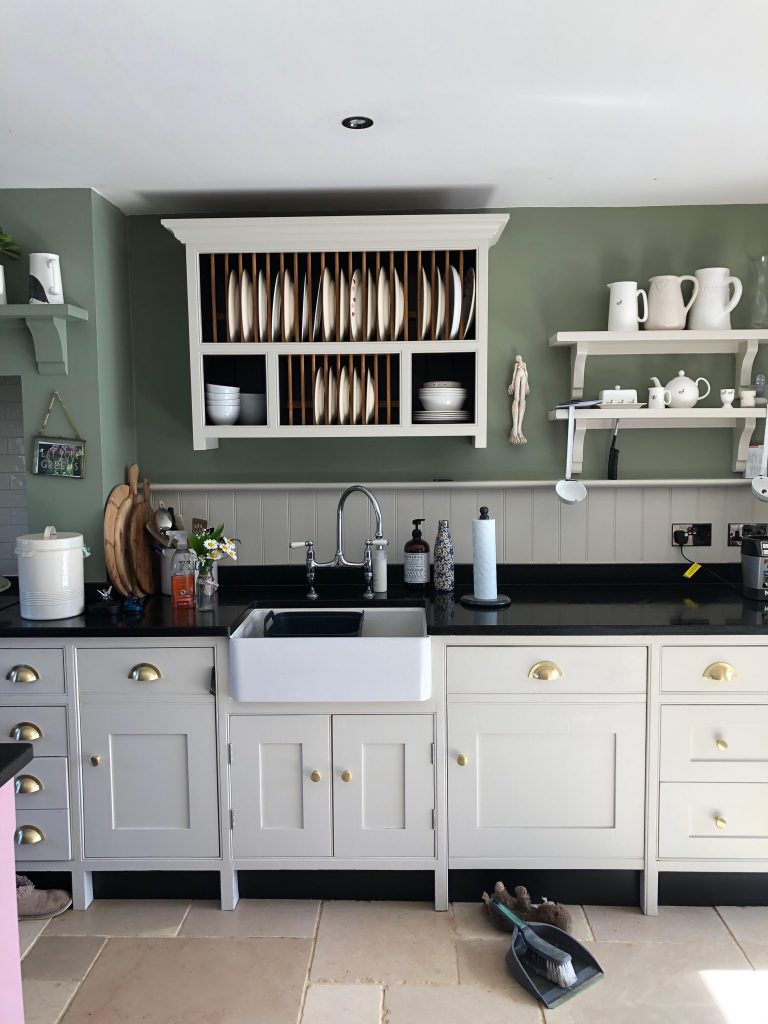
Here is a photo I took in our kitchen – the light coming in was lovely but that bright spot on the floor!! The sun wasn’t going anywhere so I improvised and asked a passing son to hold up a towel from the washing basket, to create shade – which was much better for the photo – agree that it might not matter really – but it mattered to me – and that’s the point isn’t it – beauty is in the eye of the beholder!
If I am working on a shoot and the light is bad – quite often I will be working to a deadline and the shots need to be taken – in that case I use a daylight ring. Similar to this one from Amazon It’s been a lifesaver !
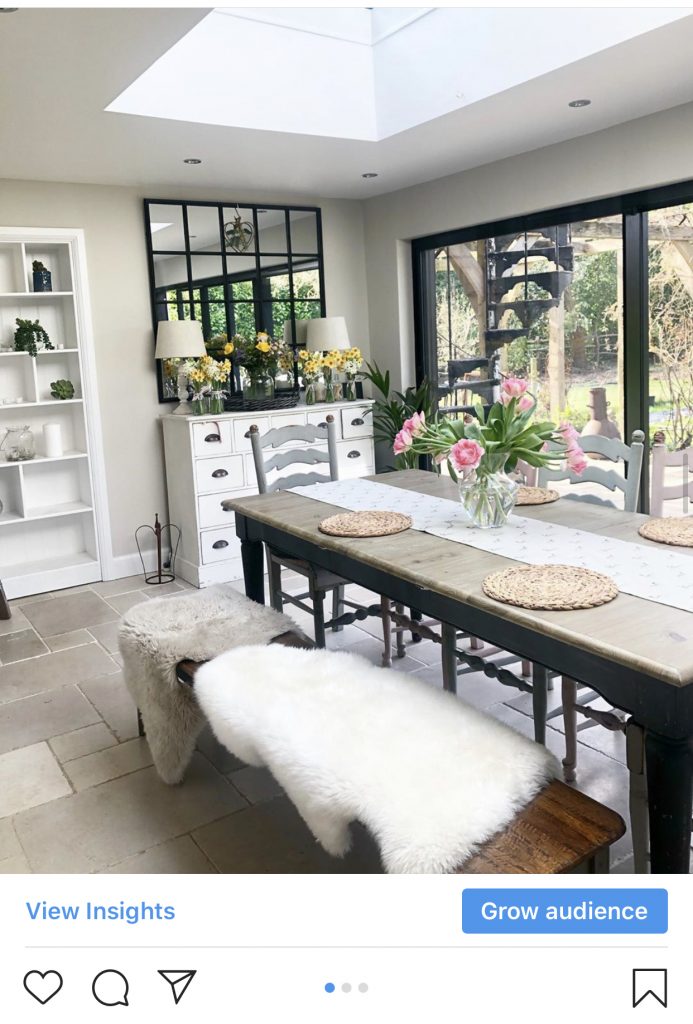
When creating a shot, be mindful about the whole shot – look round the edges for anything that you don’t want in the shot and move it. If you can’t move IT – YOU move if possible so whatever it is, is out of shot. Glance around the whole shot and if you are happy that everything is at the best angle, take the shot. Move around a bit to see a different angle and snap some more.
The top image showed a messy patio and a bag of compost – It took up too much space in my photo – so instead of faffing around outside – I just moved a bit so I couldn’t see it – the shot on my grid was cropped slightly to remove the blue door mat. (I just noticed that some oak for the extension is in shot, but I didn’t notice that at the time haha!)
Here are a couple of photos I took in portrait on Portrait mode on my IPhone 8 (Stay with me!)
The first image has the waterbutt in the background which was quite distracting – so I moved slightly to make sure it was out of shot.
It is worth saying – Do not let anyone’s Instagram make you feel anxious or not good enough. I often post the real life photo showing the mess in the kitchen on a carousel behind the ‘instagloss’ one. Grid images are real life that’s POLISHED and awaiting visitors! Just like when you tidy up for real life visitors. The rest of the time, there’s an ironing pile you can see from space and stuff MOVED out of the way or added in. Do any of us REALLY keep peonies in the sink??
My house has been featured twice in glossy magazines – each time the stylist expertly removed items out of shot (including the telly!) and added other pieces to style, such as cushions and throws. Stylists have been doing this for years and it sells magazines. I love looking at all the beautiful houses in magazines – it’s inspiring to me – and THAT is what I hope my instagram is all about. I’d like you to look at my grid, borrow ideas and use them yourselves – it’s lovely that people engage with my posts – and amazing when someone screenshots or saves a photo as it’s inspired them to do something in their own house or wear something that they may not have thought of, before. That’s what I believe creates a good solid account. And from that comes relationships and friendships and trust. Your litmus for trying a different ideas – paint, food, shoes, a glorious mix of whatever! All of that in a photo and caption! Like a mini magazine. That’s what your instagram is. And it all starts with that photo!
So Back to Taking Pictures!
If you are indoors, is it tidy? If your intention is to show an untidy space – that’s fine! But if not – have a quick tidy up. Move anything that’s going to detract your viewer’s eye from the image. Bottom line – is your photo pleasing to the eye? With all the many many photos that we are seeing every day, would yours stop someone mid scroll, long enough to like it? And even better, to read the caption and engage with you?
It’s ok to move anything that will spoil your photo – think of it like checking your hair before you go out the door, it’s not vanity, you just want to look your best and stride out with a bit of confidence.
Let’s play Spot The Difference haha

~~~~~~
Here is an example of just some of the shots I took for an advert last winter – the light was constantly changing so I hung around and got loads of shots so I could choose the best one for the grid. If I am working on images for a Paid Partnership it’s not unusual for me to take hundreds of pictures. If it’s just for me then it depends – I always end up taking a few to decide which I like best. These were taken on my Olympus Pen7 – quite often it’s in the contract to take high res images as they might end up in places other than social media, say for print.


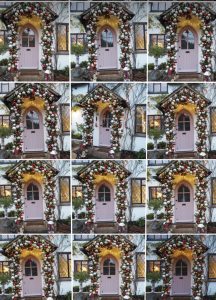
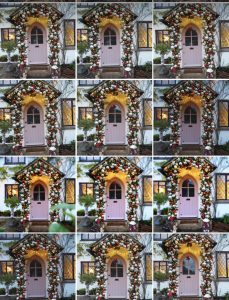
And here is the final cut. I went with an angle as I realised I wasn’t showing a wreath for the door – I had one, but it wasn’t on brand for the shot, so, side on was the way I got round it! I did kick myself! But the photo worked and it was only me who knew the mistake (well, you know it too now. Sshhhhh don’t tell the others!) So what I am saying is – move around to get the best angle and wait to get the right light!
 This image took almost three days to capture. Two days of prep and styling and then hours waiting for the light on day three. Then there’s the editing, caption writing and creating a blog post about it for a press release. Many hours unseen in that one image.
Good images take ALOT of time, planning and work, I realised a couple of years ago, that I couldn’t do it for brands for no fee anymore. In return for ‘free’ stuff. It wasn’t just working. Creating a good post/good content – eats in to family life and when it is taking up alot of time, for no return it there comes a point when everything pivots and you either start to make it a serious side hustle that earns money, or you don’t. Whatever your motivation for creating your posts and engaging online, always value your time. If you are running, say -the IG account at work and your boss doesn’t allow you to create the posts in work time, you need a chat with your boss! There is SO much value in what you can bring to the business via instagram, and if you are running a large account, it can be a full time job. But that is a whole other blog post!
APPS
There are many photo editing apps out there – If you admire the ‘curated’ grids of your favourite accounts, scrutinise them a bit more and you may notice the colours of the images all kind of match. They also might subtly change through the seasons. This will be done very much with intent, so when you look at the grid as a whole, it looks cohesive, slick, clean and professional.
You can play around editing the light in your images through apps such as LIGHTROOM and you can save the presets so your images all have that curated look, and you can subtly change the presets as the seasons change. It works really well and I admire accounts who do that. Lauren from @HuntersandHeels does it brilliantly – her grid is absolutely beautiful. As is Cara from @CaraSuthers – her shots are gorgeous and the curation is very subtle and really lovely.
If you want to be really organised there are apps out there that let you see your grid with different photos in different places and you can shuffle images around before posting to see what your gird looks like and pick the best photos to post in the most desirable order. One is Called MOSAIC
I will say though, if you are photographing places and things around you , such as the interior shots inside your house, the photos will curate themselves as the cohesion is already there. Your decorating palette, the rooms etc.
Emily from @AcornCottage is master of this -her palette is her house and the touches of pink keep it cohesive – its lovely!
Katie from @ComeDownToTheWoods is well worth checking out – her house is her palette and I love it – I’m considering moving in haha!
@PlaceFortyEight is another account I love for the natural curation of her interior shots. Katy has a really good eye for a shot.
Your shots might also naturally look cohesive if they are all outfit shots of you in different locations. Or you might prefer to shoot outside and spend time creating a grid of say, nature shots.
I would say, try not to shoehorn yourself down a road that is a dead end! It is very tempting to ‘play to the audience’ and post shots that you know have been popular before. For instance – my front door. She is a beaut and loves to be on my grid, and the posts always do well. It would be tempting to only post photos of the front door. But then if I wanted to photograph something else – I might feel I can’t because my audience is only here for the front door! Then I would be stuck. We used to talk about ‘niches’ not so long ago – ‘find your niche and stick to it’ said the experts. I heartily disagree for exactly the reason above- you might end up ‘stuck’ taking one type of image and not feeling like you can change.
On another note, I believe that small businesses can successfully merge business and home life as long as both types of photo look lovely with an appropriate caption so the ‘home life’ images don’t detract or derail or devalue the message you want to get across as a business.
If you aren’t sure where you fall and want to upload all sorts of photos – do it! Point and shoot and talk about what’s happening in your life in the caption – I call it microblogging. It’s still worth spending a minute or two to get the best shot you can, so anyone landing on your page, as I said earlier – will stick around long enough to read your killer caption!
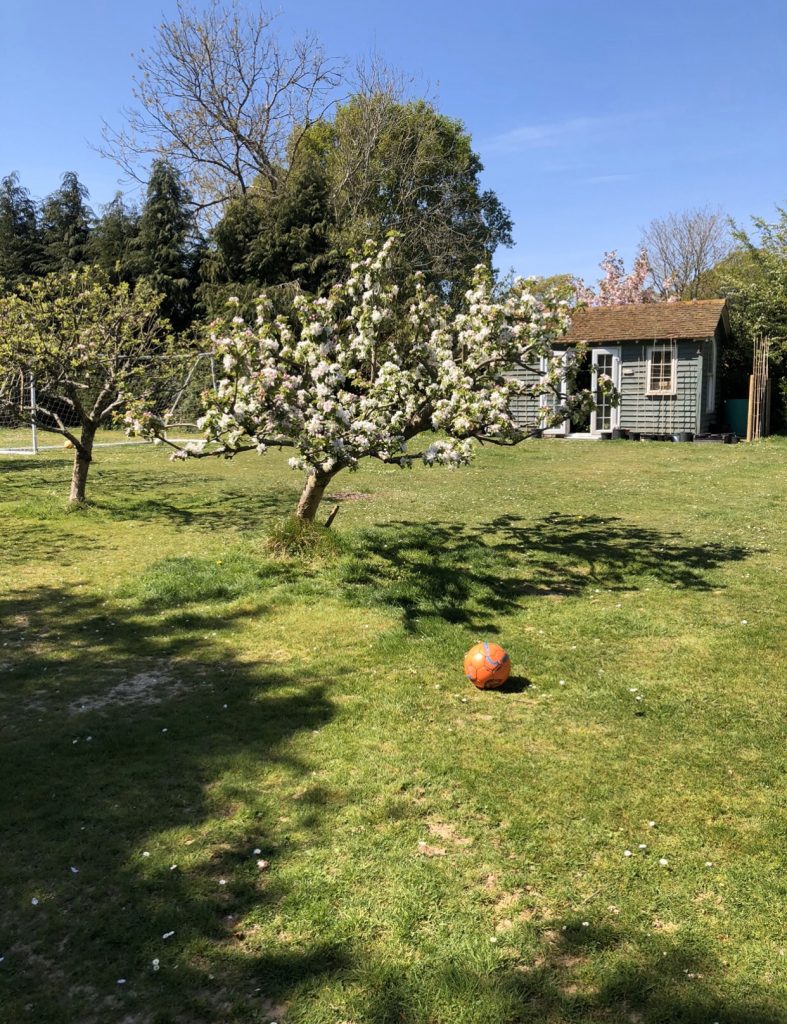
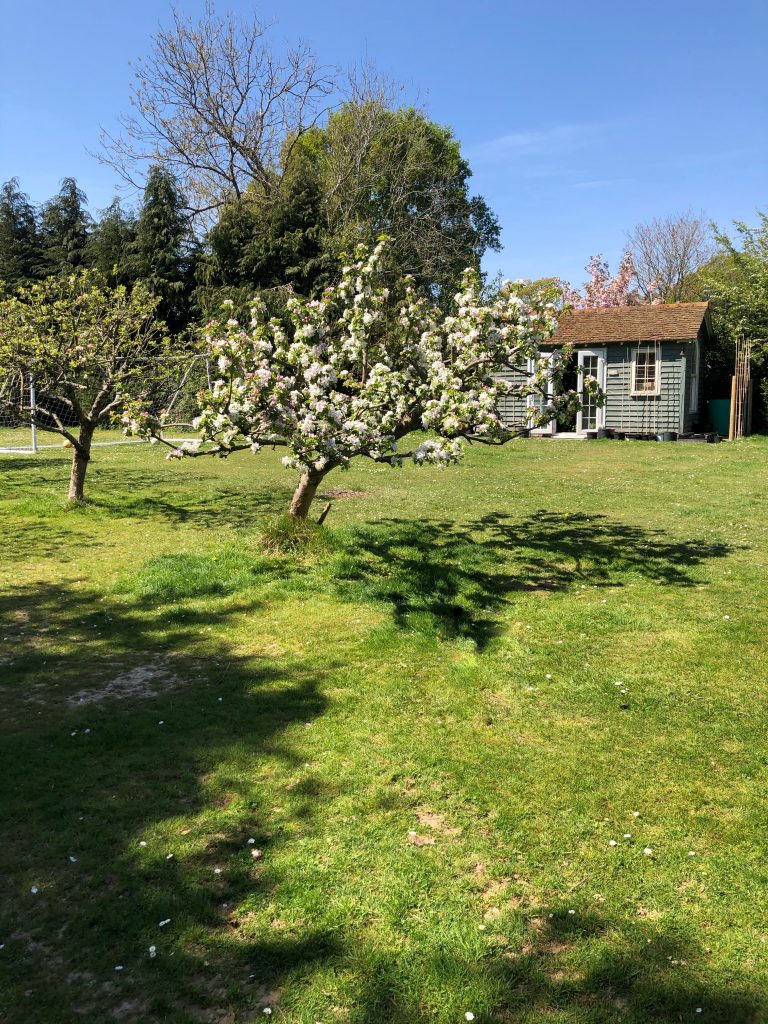
Broadly speaking the only time I use an app to edit a photo is if there is something really spoiling the view! Here is a quick snap from the garden – the football spoils the image -So I used the ‘Healing’ tool in SNAPSEED to magic it away! Voila! Tis gone! Banished! (If only it was that easy in real life haha!!) Look closely – you can just about see where the football was.
The other instance is when taking a photograph of a lit candle. I always find it really hard – I am not an expert with my camera – and the phone gives off that annoying spur – so here’s a hack to get round it –
I use LUMYER – an app where you can add effects to your image -the only annoying thing about it, is that it’s optimised for square images (fine for IG – but will chop parts of your photo off, if you shot it in portrait)
When you post it to your grid, it will actually post as a video, so the video VIEWS will be shown rather than the LIKES. (These images are stills taken from the videos)
Using a subtle edit in Lumyer can bring a photo alive! I love the smoke too – this effect can also be use over a mug of tea as steam – and personally, I think it’s worth upgrading the app to lose the water mark and release all the effects.
To add sparkles and twinkles I use BOKEHCAMFX – I think the sparkles lifted this image – it’s worth having a play around with the size, shape and colour of the sparkles.

A Quick Note About Spam
Don’t spam your audience with multiple posts – it’s a sure fire way to be unfollowed. If you have lots of images you’d like to share in one day – use the carousel option to post up to ten images behind one grid image. Tap to upload an image and then tap…
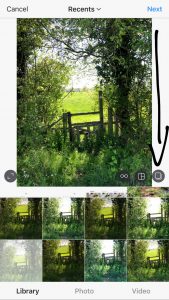
…to add more images to the post. You can edit them separately and shuffle the order of them. One of the bonuses of posting a carousel is that your media will be shown to your audience multiple times – have you ever noticed the blue dots under a grid image – you can swipe to see the other photos, but if you don’t, instagram will most likely show you them anyway when you scroll. You will notice the blue dot moves across as each image is shown to you. You might have noticed during your scrolling that you are being shown carousel images.
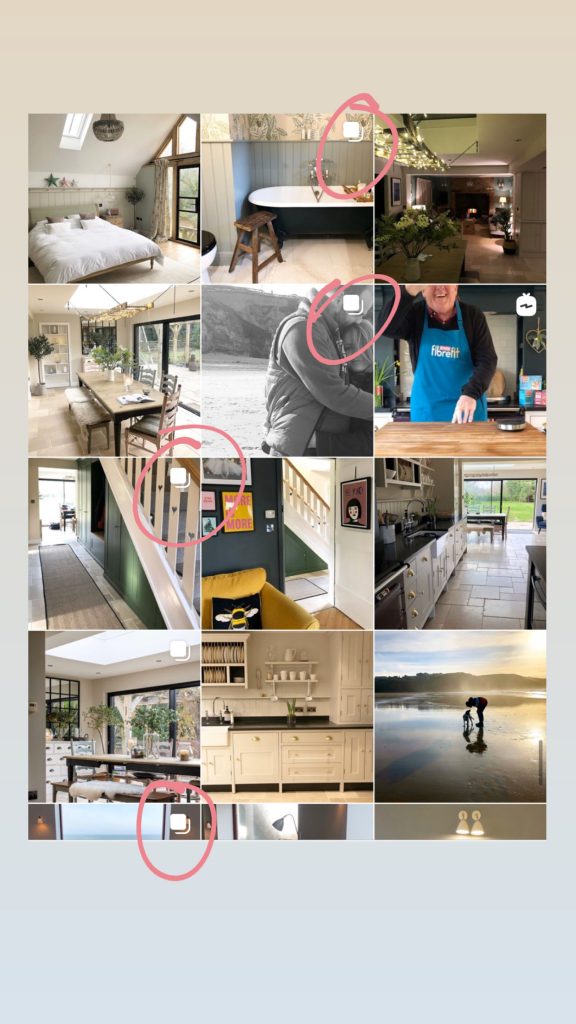
See the little dots? Whichever image you are viewing within a carousel, will be indicated by the dot turning blue. So here you are viewing the first image of three.
If you are looking at someone’s grid, you can tell the carousel images as indicated by the pink circles.
Carousels are really good for Before and After images – just make sure that the AFTER is the first image that’s seen to keep your aesthetic and ignite your followers’ interest. Unless you particularly want the Before to be first of course – your grid your choice!
How I Edit My Images
Apart from using the apps above if I need them – I always edit my image within instagram before posting it. That’s it. Just the IG edit. (Gasp from the crowd) No other apps, just the edit within IG.
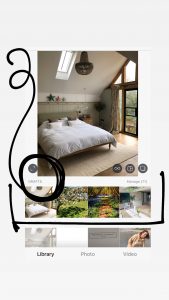
Once you have taken your shot and chosen it to be on your grid
Upload to Instagram but don’t post it yet!
Don’t choose a filter. Click “Edit” instead. This opens up loads of really simple opportunities to make your photo look even more amazing than it is already.
You will also notice a ‘Magic Wand’ at the top of your screen. This is the ‘Lux’ button. click it and slide the scale up and down to see the difference it makes on various images. See if you like it.
Press cancel to get back to the menu and press Edit again. My favourite edits are subtle, to create a light and airy grid. You may prefer a different look. Say, dark and shadowy, or really bright, colourful and pretty like Kristy from @KristyWicks
Make sure your phone screen brightness is turned up – if your screen is dark you’ll get ‘false edits’
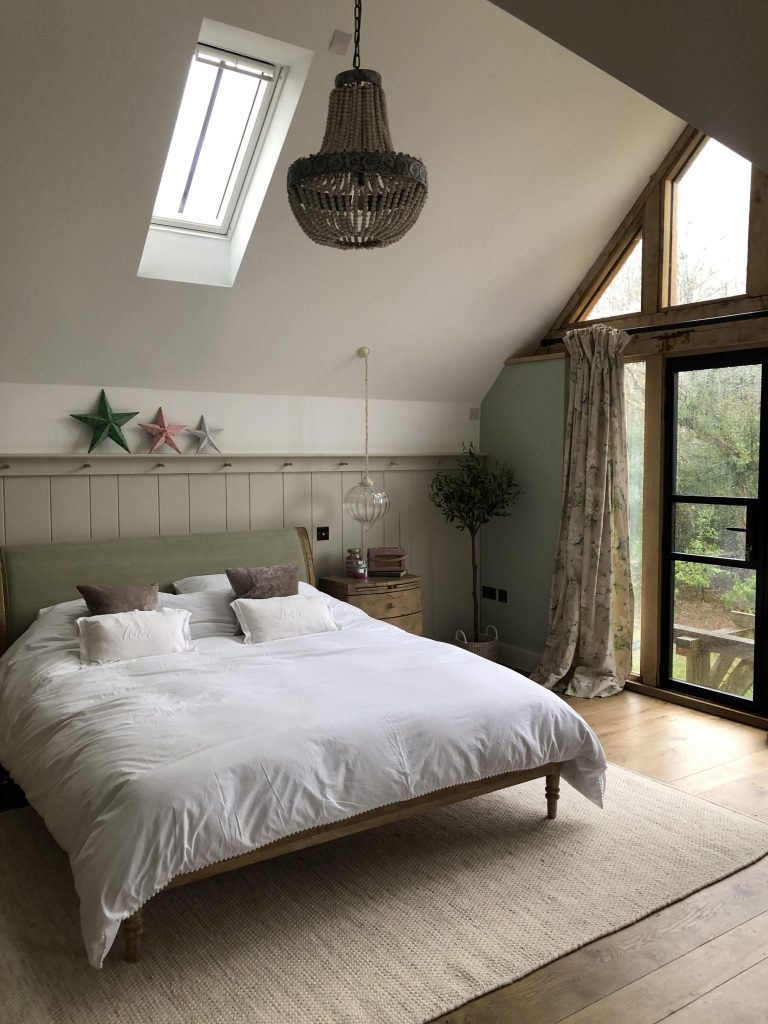
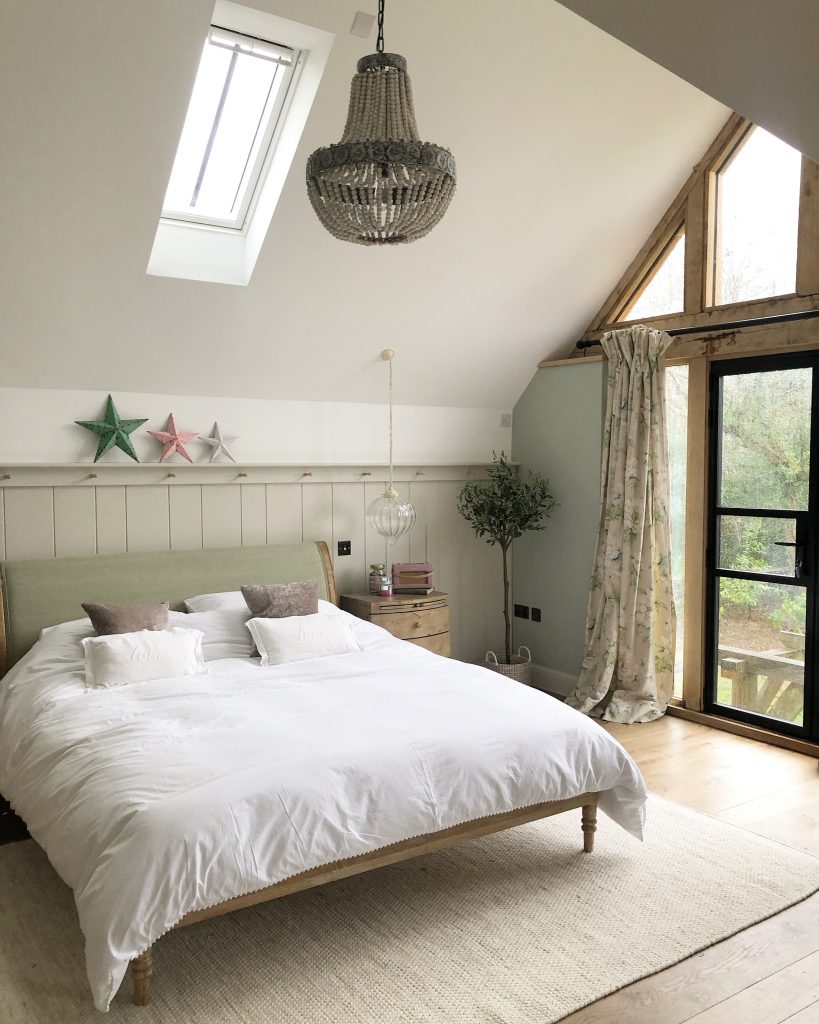
Here is my photo before any edits – not bad but could look better
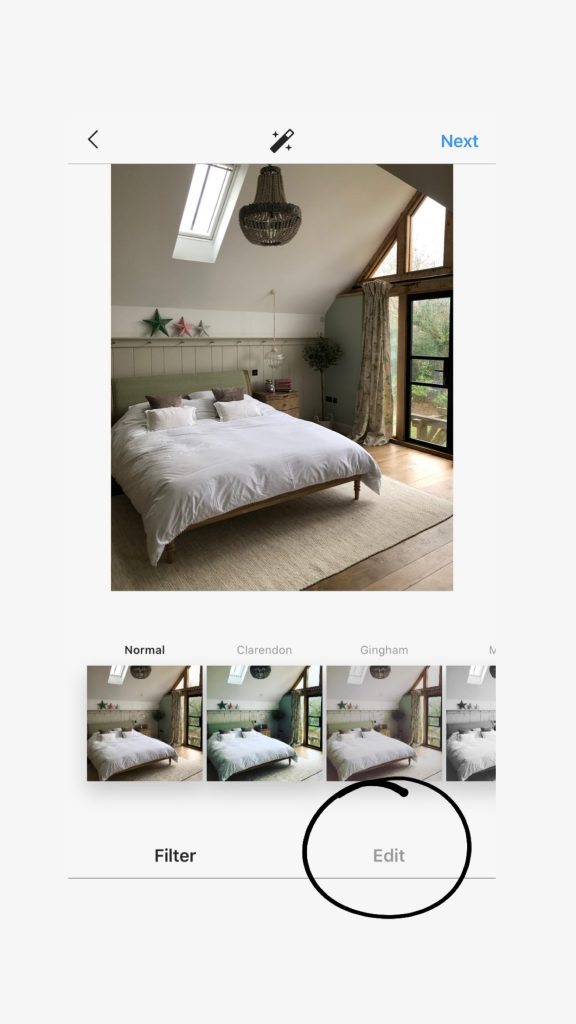
Here are the screens you will see once you click EDIT. (Don’t click ‘Filter’ – you can make a much better job of it yourself.
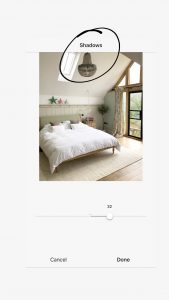
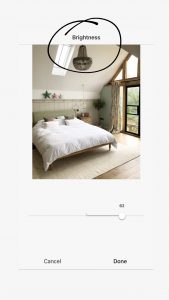
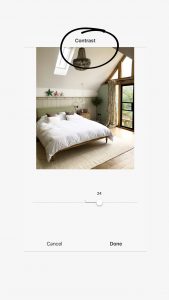
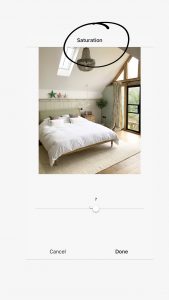
And here are the edits that I use most often – Brightness, shadows, contrast and a teeny bit of saturation. Slide the scales up and down on your image to see what you like best.
Here is the final edit.
You can tap and hold the screen during each edit to compare what you are doing with how it was before.
If you are happy with the edit, click ‘Done’ if not, ‘Cancel’ and keep going.
I like my images to be bright and airy and would love to be organised enough to use a Lightroom preset (it sounds so cool too) but I am not! The IG edits within the app are fine for me. I have done ok using them so far. You use whatever you feel comfortable using. Have a play.
Some people will say they prefer the original image – everyone is different and you are master of your own grid, so have it as you like it!
If you are ready to post – go ahead and click through to write the caption
If not – your work is not lost if you add your finished (or even part finished) edit to drafts – you can pick up where you left of at another time.
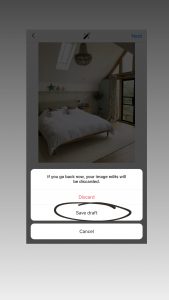
You can find your draft post again as indicated below.
Captions
Are vital. The end.
Never upload an image with out an explanation. There is ZERO to engage with, and it seems to me a rather pointless affair. Your followers aren’t mind readers and they will want to get to know you. Find out a bit more about the image – or find out a bit more about YOU.
Your caption doesn’t need to have anything to do with the image – it is up to you.
Scroll through your favourite accounts – see what they do and try it. Why are those accounts so appealing? Some of them are (and they say this themselves) not actually that good at taking a photo and editing it, but they have built up really large followings by writing such brilliant captions, people know what they are getting with this type of account and LOVE reading the brilliant caption. I know this contradicts what I said earlier – but the accounts I am talking about still take clear, bright photos – quality photos, they just don’t stress over the detail, and throw them selves in to the caption and have made their way that way.
I guess what I am saying – for me – I want to know about more than the photo. I was a hairdresser for 30 years. I am NOSY, I love people. I love it when I can see someone’s personality shining through. THAT is the magic. BE YOU!! I want the whole package – a great photo to draw me in (that’s the shop front) and once I am inside that shop – I want to be HOOKED. Building up a large following on here is something I get asked about alot. I think if it was easy everyone would be doing it, but if you love what you are doing, I think it comes a bit easier. Have the courage to do it your way.
The Dreaded Algorithm
Instagram doesn’t show all of your followers your lates post. It can be hard to get seen and heard amongst the noise. The algorithm is in charge and I have learned a few things along the way –
The hour after you post is what I call ‘The Golden Hour’ this is when that algorithm will start (or not) to push your image wider to more of your audience. I always try to hang around after posting to reply to comments in that hour – for starters I think it’s not really cricket to ‘post and run’ . You have posted to get a reaction so I think it’s polite to stay online and engage with anyone who takes the time out of their day to engage on your media. Ignoring comments just isn’t how this app works. If you post with no caption, and ignore any comments, you (say in wicked witch voice) will be punished! (caveat – sometimes personally speaking the comments are like a tsunami and try as I might, it’s sometimes impossible to keep up – but you guys know I always try!)
If you have ‘played nicely’ Instagram will remember this and show your media to more people next time. It can be VERY time consuming. Any of the large accounts you follow will have put the hours in and grafted hard to get to where they are. But ANYONE can do it. There are no short cuts and whatever you do NEVER buy follows or likes. Why have a fake account with bought followers and bought likes? If you suspect someone does this, or is playing ‘follow/unfollow to gain followers – you can check them out HERE
I often get asked if it’s worth switching to a business account and I always answer YES!! The insights are invaluable and I don’t believe the algorithm ‘punishes’ accounts for switching to business. I DO believe that the algorithm is blamed for loads of things such as a a drop in engagement, posts not being seen or not getting many likes on that photograph you just sweated blood over. I am honestly of the opinion that if your audience doesn’t like what they see, they won’t engage, so (whispering) instead of focussing your annoyance at the algorithm and blaming it – maybe switch up what you are posting. Spend time engaging with your audience and accounts who you follow. Be an active user. Show up. Join in!
Hashtags
A very quick note on hashtags as I fear I may have already overwhelmed you
Hashtags do help you to get seen. Think of them like a mini search engine within Instagram. If, for instance you are thinking of going to visit a place (one day!) you can search that place’s name using the hashtag. If you are considering painting your bedroom walls a certain colour, again, you can search the hashtag. So by USING hashtags, they help you to be discovered by the accounts that are SEARCHING those hashtags. So don’t do what I sometimes do and use ridiculous hashtags for a laugh – think about your image and what YOU would search if you were looking for a picture like yours. A note to the wise if you want to be seen under the hashtag – choose a hashtag that’s a bit more targeted – for instance #fashionblogger has 115million posts under it – so if you use #fashionblogging with 477k posts, you will have more chance of being seen. #shakercabinets has 48.6k posts so if I am using hashtags to be discovered by new accounts I might use that one if I am posting a picture of my kitchen.
Some of my favourite hashtags to follow are
#myhomevibe Created by @_Lisa_Dawson_ (her house is amazing)
#myhousethismonth Created by Amyfrom@littlehouseinlondon
#faffthegaff Created By meeeeeee
#pinkfrontdoorsofinstagram Created by me too heehee
#PostItAndSmile – Created by @JPslifesandloves
Some brands have their own hashtag, so if you are a fan of a certain brand, you can follow the hashtag and every day you will see a few photos from accounts using the hashtag. It’s a good way to find new, like minded accounts. And – worth noting – the brands usually check to see images of their products posted under their hashtags so if you use them, you might get shared by the brand if your pic is up to scratch! And that might lead to paid work – you never know.
Here are a few to get you started – (I love interior hashtags – can you tell haha)
#myanthropologie – AnthropoligueEU
#myMarks – Marks and Spencer
#mywhiteco – The White Company
#loveyourspace – House BeautifulUK
#mysainsburyshome – Sainsburys Home
#hmxme – H&M
#hmhome – H&M Home
#sophieallport – Sophie Allport
#houseoffraser – House Of Fraser
#neptunehome – Neptune
Search out your favourite brands – if they have created a hashtag it will be in their bio (the bit ‘about them’ just under their name on their account. Incidentally, a ‘bio’ is the only place you can put a live ink to an external website. (Apart from a swipe up in stories -at the moment you need to have over 10k followers to get a swipe up function)
If you would like # ideas emailed straight to you by Sara Tasker of @me_and_orla you can sign up here
Sara is an writer, creative business coach and Instagram expert who also hosts two podcasts that I have really enjoyed listening to ‘Hastag Authentic’ and ‘Letters From a Hopeful Creative’ . The former named the same as her book and the latter hosted with @JenCarrington_, a life coach, creative writer and podcaster.
FINALLY !!! You have reached the end! Congratulations!!
I love Instagram & the accounts I follow for many reasons. For opening my eyes, for the beautiful photography, for what they teach me, for interior inspo, for a peep in to a different world, for travel ideas, for home ideas, for the fun they bring, the stories they tell, for the confidence they give me to try different things whether that is a fab new recipe, courage to wear an outfit I may have shied from, or empowering me to paint my kitchen island pink. Especially for the relationships and friendships formed. I particularly love that geography makes no difference, I love that I now have friends who I would never have been lucky enough to know ‘Before Instagram’.
Every single account has something to offer, something to say if we listen and something that might enrich our lives if we stop scrolling and look.
And it all starts with a little square image!
As ever
THANKYOU for stopping by – Please step up to receive your medal if you got this far without dropping off – it was only ever meant to be a short post – I do love to chat!
love


Really informative, even though I rarely post on Ig, some really good info for generally taking or saving pics.
Thanks Sally 👍
my pleasure! glad it was helpfulxxx
A great read Sally, thank you. I just wish I had more time to grow my account – it’s stagnant at the moment through lack
of engagement on my part. Still love following you though.
Janice
That was such a brilliant insight into how you go about taking photos and creating a successful post. Brilliant Sally! Longest post I’ve ever read, but worth it and thank you so much for the mention too. Luv ya! Jp xx
it was a bit like War and Peace! Thanks JP xx
This is a wonderful post Sally, thank you for taking the time to write it all out! So helpful and insightful 🙏 xx
Hi I’m 58 and completely clueless to all this so thanks I enjoyed reading this as it gave me several explanations about things thankyou Rachael maybe I can have a go
HI Rachael
Give it a go! Keep at it – it will get easier I promise xx
Thanks Sally, wanted to read this when you posted it, have only just managed to sit down to do so. Brilliant and easy to understand and follow. Cheers.xx
.
I am so glad it was helpful! xxx
This was so helpful, I didn’t realise there was an edit feature before posting!
Also thank you for the mention x
Hi Katy
Ahh my pleasure! Your images are lovely! And you aren’t alone in not realising there’s an edit function! Whatever you are doing looks amazing mind you! xx
Thanks Sally, a really helpful, honest and easy to use, post. I think I may have to follow you again 😉😉 Anji
P.s. am also passing on to @moormorocco she’s doing some thinking and work on her grid.
Hello! I am glad you found it useful 🙂
Been meaning to read this for ages and so glad I did 😂 I feel like a total chump – I’ve had an iPhone for years and have loved Instagram for nearly as long. Feel like I can look at both differently now. Off to take some improved shots – thank you 😊
It’s much easier when you know a few tips! Glad I helped xxxx
Thank you so much Sally – I have just learnt so much from reading this blog!
Finally got round to reading this! Thank you so much Sally, lots of really good information, now to put it into practice!!
Really interesting to read thank you. When I take early retirement next month I hope to do more on IG
Bev x
This is a really great read and I made lots of notes😂! Thank you for all the clear information on taking photos, my teens seem to do it all so naturally but don’t really want to spend time teaching their mum! My 13 year old daughter did something today where she captured some of Alive Liveing Live on dyeing your eye brows and I was like ‘Wow how did you do that?!’ You can imagine the look I got!! (she did sweetly tell me but it was brief).
Absolutely loved reading this blog. Some things I’ve slowly figured out but so much more to try after reading this. Very, very helpful. Thank you.
Once again brilliant info, thank you so much, your wealth of knowledge is endless and I’m so grateful you are sharing this 😍