


caption id=”attachment_1208″ align=”aligncenter” width=”225″] Welcome![/caption]
So, when we renovated our house, almost 10 years ago, the bathroom was the last room to be tackled, and we had no money, no energy and absolutely no inspiration left. I couldn’t even choose a tap. (so we didn’t have taps on the bath – we had an overflow filler thing. Clever, but I found it very dull, no joy in invisible filler taps as it turned out)
Ten years on and I decided that it needed changing – immediately! Poor Gav – he rolled his eyes, listened to my very well presented argument, and he said ‘Fine my darling – call a plumber’ ..or something like that..
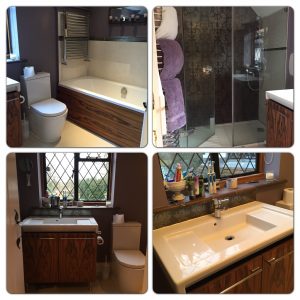
It’s not like the bathroom was awful – but it was ..uninspiring, I guess. I mean, even though I still secretly kind of liked the brown and gold flock style wall tiles, it was all chosen in a hurry and there-in lies the mistake. Don’t choose stuff in a hurry – or when you are hormonal.
So! The start date was set and we – oh let’s be honest here, I – chose all the new fittings and Gav agreed with everything. He is very wise. After 22 years of marriage, he knows that the conversation will go like this
‘Hun, I like this one but which one do you like?’
‘I like the other one’
‘Ok so shall I order the one I like?’
‘Yes’
Haha
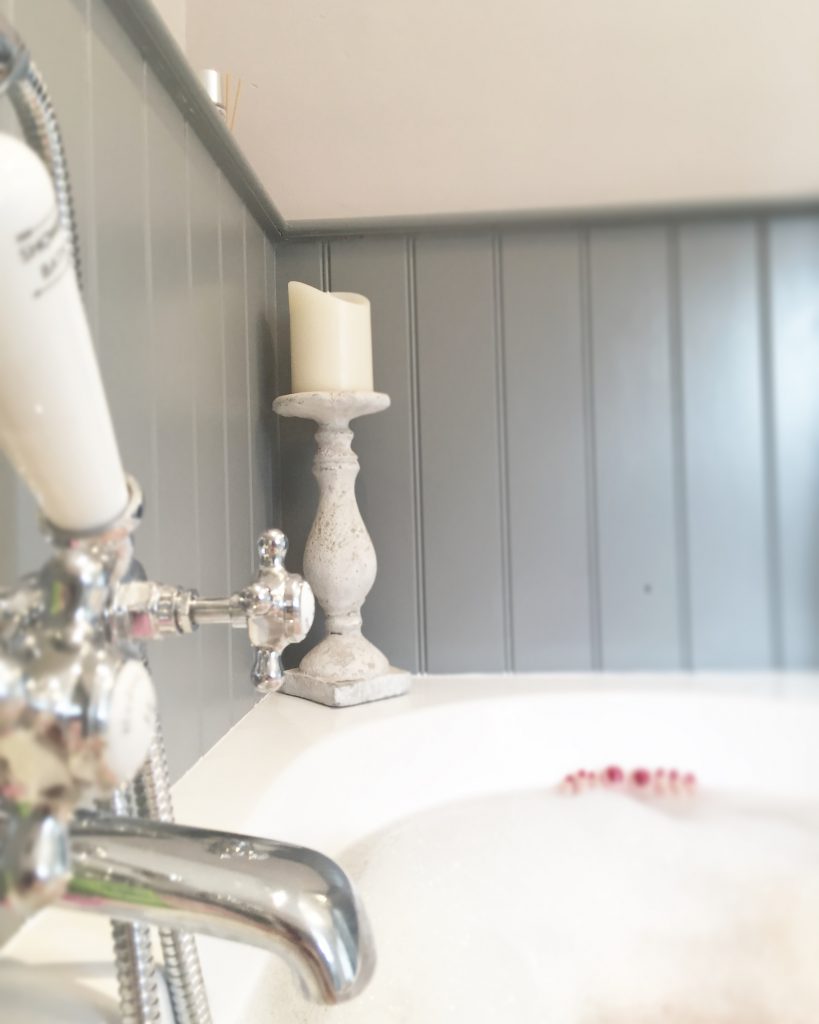
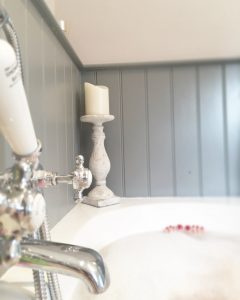
So – the bath and the shower tray, were perfectly fine, and we kept them. ( I really fancied a free standing bath, but alas no room, also there were too many pipes underneath as it was never meant to be on show. BOOO – by the way, here is a fab bath, if you have a small room like ours, but fancy the look of freestanding click here, it’s lovely.
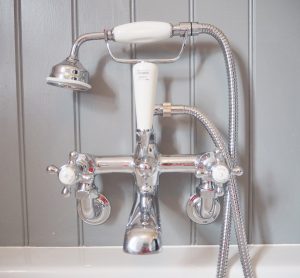
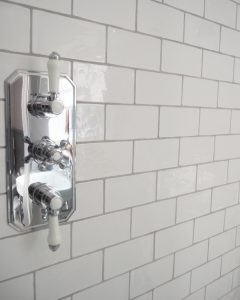
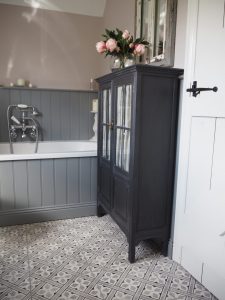
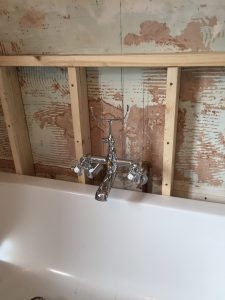
We chose the fittings from Victorian Plumbing, there is a link to the wall mounted bath taps that we chose, here. I really love the look of wall mounted taps and the only way we could have them was to move the bath forwards by about 10cm, so there was room for all the pipe work behind. I love the look of tongue and groove paneling, we chose, ready primed 9mm MDF from Wickes. Ready primed!!! It’s a game changer!!
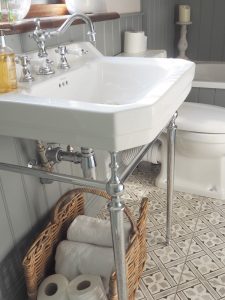
As you can see from the ‘before’pic (it’s at the bottom of the page) – we had a huge sink with a big cupboard underneath, and even though it was useful – it was FULL of a load of stuff we never used – like out of date Calpol, sun cream from 8 holidays ago, and all manner of smellies that no one ever used. We were ruthless and it felt so good!!
In it’s place we/I (insert winking emoji) chose a gorgeous Victorian style washstand – you can see it here – which meant zero storage! Anyone who follows me on Instagram knows exactly how I overcame that – and I’ll chat about it later in this post! Also – whilst choosing taps for the basin I thought about all the stuff that we really wanted from our taps – years of bad tap choices! Mixer. Had to be a mixer, to avoid all that faffing around freezing and burning yourself with single taps.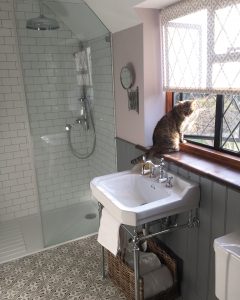
I was so happy when I found one with a fab swivel spout (here) – I find it is much easier to clean the sink using a swivel! Plus I think it looks really lovely on the basin. And that is important too isn’t it! You gotta like it! (unlike the old bath filler..)
 Our shower enclosure sure is a large one with glass doors that were made especially for the gap and cut using a template. (old wobbly walls that aren’t anywhere near straight) We kept all the glass and re hung the door – as there was nothing wrong with it and bespoke glass screens are really expensive!
For this space we just changed the controls – lovely shiny new ones (here) and we treated ourselves to an enormous new shower head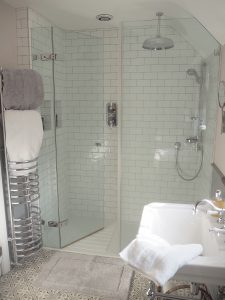
On to the tiles! I totally blame my day out at Laura Ashley Press Day for this! You see we had been offered ice cream and in the rush to get to the ice cream station, I literally tripped over the tile samples!! Fell slightly in love, and forgot all about the icecream (only for a bit, mind) I mean – Mr Jones! he stole my heart from the moment I set eyes on him (ought to explain here, that the floor tile I fell in love with, is called Mr Jones, Mr Jones is not a man with a mooostache) And I fell in love with the charcoal version. He was shown with their artisan wall tile range, which has such beautiful chalky colours – but I chose white. There are two different sizes and we went for the smaller ones.
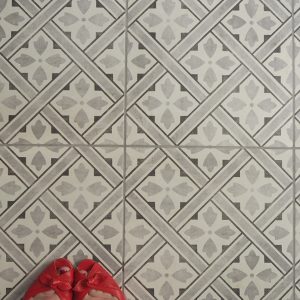
On to the question of grout! I mean, who even knew that grout comes in a rainbow of colours?! I had no idea and it was quite exciting! (also, who has bright yellow grout?? interesting..) Anyway – we chose ‘Manhatten’ for the walls and ‘Medium Grey’ for the floor – I pinned a section of the Mapei Shade Chart so you can see.
Oh yes! nearly forgot! The whole process took justunder 4 weeks and the whole time, we protected our stairs and landing carpets with the most brilliant stuff! Builders always arrive with hideous dust sheets don’t they. They arrive in a cloud of dust and proceed to unfurl it on to the stairs, which, apart from being just gross and dusty, is quite a trip hazard isn’t it!! We discovered Sticky Shield and once it’s down, it’s down! It’s super hard wearing, yet lifts up a dream and leaves no sticky residue on the carpet. I’d also use this stuff as floor protection when decorating – it’s much nicer than a hideous old dusty dust sheet. Certainly made the month more bearable.
The bit I loved most about our bathroom makeover, was choosing the colours and accessories, and I treated us to some lovely Molten Brown handwash, which obviously, no one is allowed to use!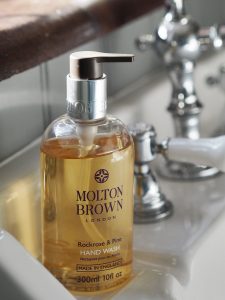
I have always used Farrow & Ball paint – I adore the chalky finish, and I love that the colours have so much depth, change in different light, and don’t look harsh. I also love that you can’t really choose the wrong colour. The hues are so soft and gentle and easy on the eye, and they all compliment each other. I really fancied a darkish grey on the paneling and settled fairly quickly, on ‘Plummet’ – I also fancied the softest blush pink on the walls above, and settled on ‘Peignoir’ – it is more what I’d call ‘blush grey’ than pink and that suited us just fine! I love how it looks next to the grey grout, too.
I’ll be guest blogging for Laura Ashley and when it is published I’ll link it here – they were kind enough to send me some gorgeous accessories.
Now for the matter of storage! Bathroom storage can be really expensive can’t it! Oh my there are some proper swoon worthy cabinets out there – but I fancied something different. Dragged Gav off to a car boot fair and it was like it was waiting for us!! A gorgeous little double fronted cabinet with glass doors and heaps of storage. It needed upcycling – which took me a day, so was totally worth the £38 outlay!
Instead of rambling on about it on this post – you can find all the info here. I am so pleased with how it turned out, and more than relieved that it fitted !! And the whole of Instagram, who had been waiting with baited breath, could sleep again, once they knew – haha!
Well, if anyone wants me – I can be found, prune like, and happy, languishing in posh bubbles!
Thanks for reading!

ps here are a couple of before and during pics x


I love your hardware in here. the silver taps look great.
Would you mind sharing where you got that gorgeous black leaf shaped door handle from? Simply perfect!
Hey Sally, I currently have a very similar set up with my bath but they have terrible tiles. If I changed to the shiplap is it at risk of getting moldy?
hello! I can report zero mould and we are 5 years in xxxx